
2021-01-01
I was running backups on my system (Ubuntu 20.04) and realized that
my ~/.thunderbird folder was huge. It was about 10 GB in
size! That is a bit too much for my liking. I use Gmail as my primary
provider. There were a lot of emails (over 50,000) stored on the server.
I wanted to organize and move them offline to free up space. Why? Google
has always touted that you shouldn’t have to delete anything. Well, I
have email going back to 2004, and with Google’s
announcement about photos I figured now was the time to free up
space.
I have Thunderbird linked to several different accounts, including my primary account, a Gmail account. It is linked to this account using IMAP. IMAP, in simple terms, means that changes on the server are reflected in the client. Changes in the client are reflected in the server. It is an excellent way to keep several devices in sync. It is beneficial when connecting mobile devices and desktop/laptops to the same email box.
You have to go through a great effort to delete emails in Gmail with an IMAP client connected and caching. I had moved (or so I thought) all of my emails offline, but my account was still full.
NOTE: This article was written on 2021-01-01 and was written with Thunderbird version 68.10.0 in mind.
The first step is to archive the email from the IMAP server before deleting it. That way, if I messed up, there would be a copy. The first thing I did was to compress the Thunderbird folder. From the terminal:
tar cJf 2021-01-02-thunderbird_backup.tar.xz ~/.thunderbirdThe above command will compress to the ~/.thunderbird
folder to the xz
format based on the LZMA
algorithm. Store this file in a safe place.
References:
You have to make sure you have all the folders and email synchronized
with your IMAP (Gmail) account. By default, Thunderbird syncs everything
when you set up a Gmail account. From the Edit menu, choose
Account Settings....
With the Account Settings window open,
choose the Synchronization & Storage
option in the tree on the left. It should be the one located under your
Gmail account.
NOTE: This would also apply to any IMAP account you have.
In the Synchronization & Storage
window pane on the right-hand side of the UI, make sure that the Keep messages in all folders for this account on this computer
option is checked. By default, Thunderbird should set this up for you.
If it is not checked, that is probably OK.
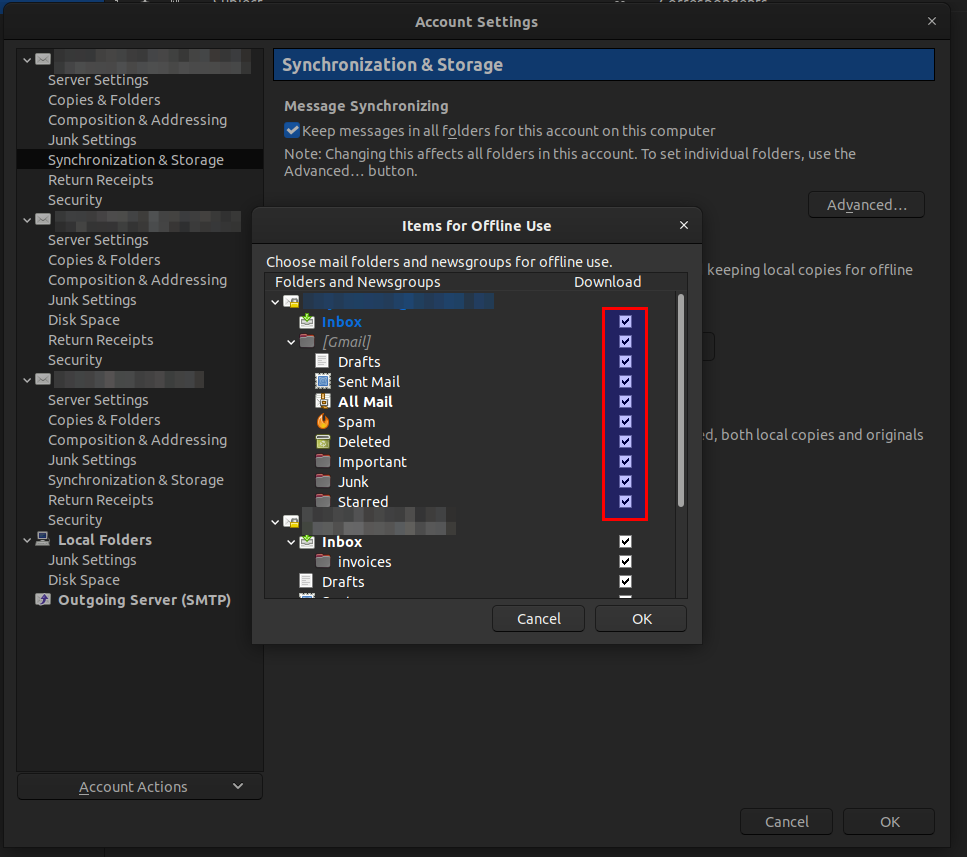
Click on the Advanced
button to launch the Items for Offline Use UI. You
will see a tree with all of the IMAP accounts you have configured in
Thunderbird. Each folder in the tree can have a checkbox. The checkbox
indicates that the email in that particular folder will be synced
locally (i.e. Thunderbird will store a copy of the email on your
computer).
NOTE: You may see that only some checkboxes are checked for the Gmail account. This is probably fine, as you may have altered them in the past. In most cases, you may want all of the folders available.
At this point, Thunderbird should sync all messages with the server and make copies locally. You can now use offline mode, which is more efficient for large transfer operations. Make sure everything has synced up before going offline.
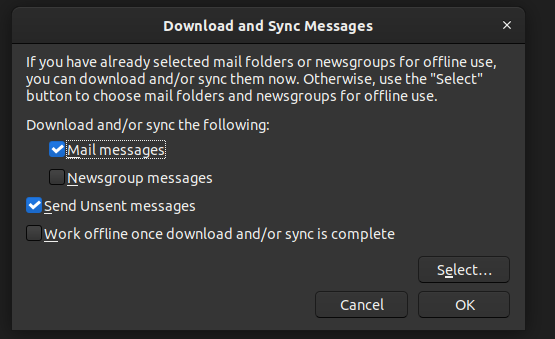
Click on the File menu in Thunderbird and choose
Offline and then select Download/Sync now. You
should see the Download/Sync now UI with the
various settings. Make sure Mail Messages is selected. You
can unselect the rest of the options. Click OK to start the
process. Wait until the process has finished.
Once the sync has finished, you will need to set Thunderbird to
offline mode. You can do that from the File menu. Choose
Offline, then click on the Work Offline option
(it is a check box option that will indicate if Thunderbird is in
offline mode).
When Thunderbird is in offline mode, it will not query any of its connected accounts. It only looks at the files kept locally. Transfering lots of emails to the local folders will be much faster.
You should have a Local Folders account in the left-hand
tree of the Account Settings window. If
it is not there, you will need to set it up. See here for more
details.
At this point, move all of the emails from the Gmail account to your local folders (you should probably take the time to organize them). Once you are finished, move to the next step.
NOTE: When you move the email from the Gmail account, keep in mind that you are moving (or deleting) the local copies. When I did it, it didn’t seem to sync back to Gmail that the emails were no longer there.
NOTE: It might also be prudent to copy the emails instead of moving or deleting them. You can always delete them afterwards in Gmail once you are done.
Once you have completed copying (or moving) the emails, I would make
another backup of the ~/.thunderbird folder with your
changes. Be sure to exit Thunderbird making sure that it done
processing.
Once you have the folder backed up:
~/.thunderbird (Yes - I am
paranoid!)I had a problem with the All Mail folder under the Gmail
account. When I clicked on it, all the email that I thought I had
deleted was still there! It took me a while to figure out what the
problem was. There were two problems.
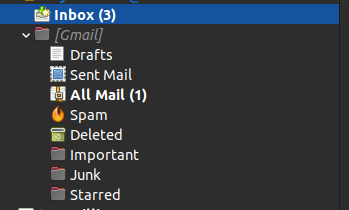
The first problem was that I still had the Gmail account set to store local copies of the files. The second problem was that delete means something entirely different to Gmail than it does to me!
References:
In the Thunderbird Account Settings
window, underneath your Gmail account, make sure the option
Keep messages in all folders for this account on this computer
is turned off (see figure 4). Click on
the Advanced button and ensure that all the checkboxes are
empty for each folder in the Gmail account (see figure 1). We don’t want to sync anything
to the local machine.

I had done these steps, and the Gmail folder was still huge. It didn’t shrink. I thought something was wrong. What was happening was that the local cache was still there. Thunderbird wasn’t using it, but it was still there.
From this
post I was able to determine what I needed to delete. You have to
find your imap.Gmail.com folder under the
~/.thunderbird folder. In the post, there are some ways to
find the location from Thunderbird. I just searched for that folder
name. If you have multiple Gmail accounts, you will have to be careful -
I am not sure what you would find.
imap.Gmail.com folder[Gmail].msf file[Gmail].sbd folderAll Mail folder - Thunderbird should sync it.
References:
There was still a lot of email on Gmail showing up in the
All Mail folder that shouldn’t be there. It was deleted! I
was sure of it. In retrospect, I am thankful that it was there. I was
messing around with many things, and it would have been easy to mess
things up and lose a lot of history.
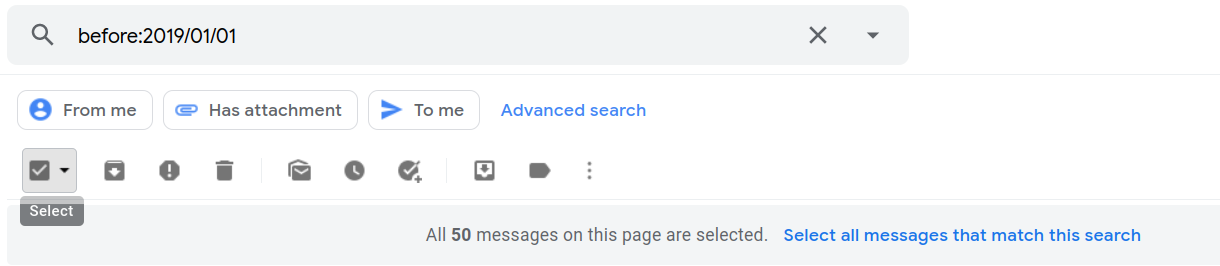
In previous steps, I have backed up all of my emails from 2004 to 2020. I decided to purge all emails before 2018. For this to work, I had to use the web interface for Gmail.
In the Gmail search bar, type in the following
before:2019/01/01. That search term will find all of the
emails in Gmail before January 1, 2019 (i.e. from 2004 to 2019). Once
you have found the emails you are interested in, selecting them and
deleting them is a simple matter. I had a bit of an issue finding the
option to select all of the emails from the search (it was right in
front of me the whole time). You have to select all of the messages that
are currently displayed using the standard selection mechanism. Once you
do that, an option underneath (see figure 5)
the select box appears. Click on the message:
Select all messages that match the search. This option will
allow you to delete all of the emails in one fell swoop.
It took a bit of time to understand the process and why it wasn’t working for me. In the future, I would set up Gmail or any IMAP account differently. I wouldn’t cache local copies for offline use - I never use offline mode! What I will be doing is being a bit more diligent about my email archive management. Every year around this time, I will archive and move offline a reasonable amount of email.
Here are some handy extensions that helped with cleaning things up
and managing the load. I used the Remove
Duplicate Messages extension to search for and remove duplicate
emails within my local folders. That tool worked well and got rid of
many duplicates I had created while figuring this out. I also used the
import/export tool ImportExportTools
NG. I used this to export a copy of all my local email files to the
.eml format. I now have full backups of the
~/.thunderbird folder and specific backups of only emails.
I sorted the emails by year, so next year I can export 2021 to a folder
without repeating the entire process.
My local folder is still approximately 9 GB in size, and I am a bit concerned about it. From what I read, this shouldn’t be a problem. If it ever does become a problem, it should be a simple matter to adapt the instructions and archive the old emails.